Vision - CullingGroup API for everyone
Created by Hiroya Aramaki (Makihiro)
![]()
![]()


What is CullingGroup API ?

CullingGroup offers a way to integrate your own systems into Unity’s culling and LOD pipeline.
- Simulating a crowd of people, while only having full GameObjects for the characters that are actually visible right now.
- Building a GPU particle system driven by Graphics.DrawProcedural, but skipping rendering particle systems that are behind a wall.
- Tracking which spawn points are hidden from the camera in order to spawn enemies without the player seeing them ‘pop’ into view.
- Switching characters from full-quality animation and AI calculations when close, to lower-quality cheaper behaviour at a distance.
- Having 10,000 marker points in your scene and efficiently finding out when the player gets within 1m of any of them.
Unity Manual: https://docs.unity3d.com/Manual/CullingGroupAPI.html
Why Vision ?
CullingGroup is a great feature, but its implementation is a difficult because it can only be accessed through scripts and its usage is quirky.
Vision has made such a CullingGroup available to everyone.
Vision Features
- Components for easy access to CullingGroup.
- Intuitive visual editor.
- High performance
Table of Contents
📥 Installation
Download any version from releases.
Releases: https://github.com/mackysoft/Vision/releases
Install via Open UPM
Or, you can install this package from the Open UPM registry.
More details here.
openupm add com.mackysoft.vision
🔰 Usage
1. Create the CullingGroupProxy
First, create a CullingGroupProxy, which is the core of Vision.
1. From the Tools/Vision/Create New CullingGroupProxy menu, create a CullingGroupProxy.
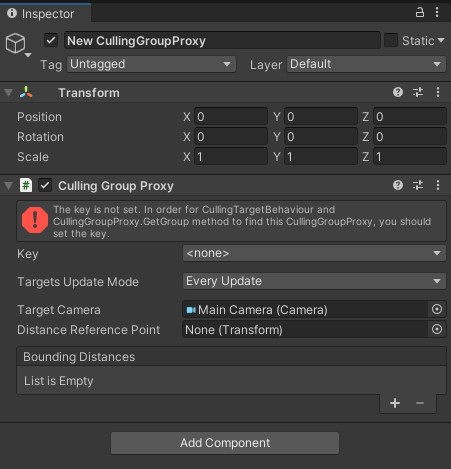
2. Set the key to the created CullingGroupProxy.
Set the key by clicking the Key popup in CullingGroupProxy. By default, there is a Main key.
If you don't see the key, open settings from the
<add key>orTools/Vision/Open Settingsmenu. You can define a new key in theGroupKeyDefinitionslist.

3. Distances
By setting DistanceReferencePoint and BoundingDistances of CullingGroupProxy, you can calculate the relative distance between a reference point (for example, camera, player) and the bounding sphere's.

If BoundingDistances is set to { 10f, 20f, 30f },
| Distance Level | Range |
|---|---|
| Level 0 | 0m ~ 10m |
| Level 1 | 10m ~ 20m |
| Level 2 | 20m ~ 30m |
The last level and beyond will be treated as invisible.
If Distances is empty, { 0f , Mathf.Infinity } will be used as a fallback. In that case, currentDistance will always be 1.
BoundingDistancescan be adjusted visually from the scene view !

2. Attach the CullingTargetBehaviour
CullingTargetBehaviour is a component that attaches to the object to be culled.
1. Attach CullingTargetBehaviour from Component/MackySoft/Vision/Culling Group Behaviour menu.
Attach this component to objects that you want to show/hide depending on their visibility, or change their quality depending on their relative distance.
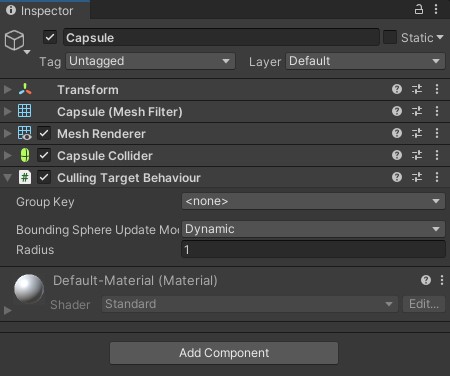
2. Set the group key to the attached CullingGroupBehaviour.
The GroupKey of the CullingGroupBehaviour is used to find a CullingGroupProxy with the same key specified,
and the CullingGroupBehaviour will be registered with the found CullingGroupProxy.
3. Adjust the radius of CullingGroupBehaviour.
The bounding sphere of the CullingGroupBehaviour is used to calculate the visibility by the CullingGroup. Completely enclose the object you want to cull with the bounding sphere.
Radius can be adjusted visually from the scene view !
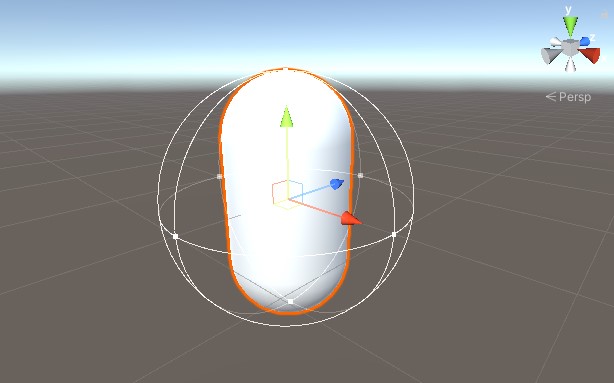
Also, during play mode, the color changes depending on visibility.


4. Select the BoundingSphereUpdateMode.
This is an important value for performance.
BoundingSphereUpdateMode is set to Dynamic by default. This means that the transform of bounding sphere will be updated every frame.
However, there are some objects that do not move. In such cases, you can avoid the extra update cost by setting the BoundingSphereUpdateMode to Static.
3. Receive a callback
Use CullingTargetBehaviour.OnStateChanged callback to respond to changes in the visibility and distance state of the bounding sphere.
using UnityEngine;
using MackySoft.Vision;

[RequireComponent(typeof(CullingTargetBehaviour))]
public class ReceiveCallbackExample : MonoBehaviour {

    void Awake () {
        var cullingTarget = GetComponent<ICullingTarget>();
        cullingTarget.OnStateChanged += OnStateChanged;
    }

    void OnStateChanged (CullingGroupEvent ev) {
        if (ev.isVisible) {
            Debug.Log("Visible!");
        } else {
            Debug.Log("Invisible!");
        }
    }

}
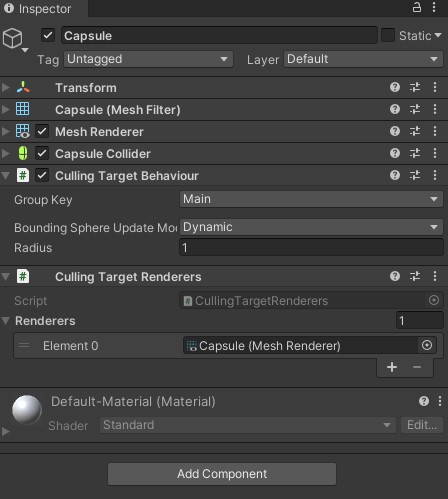
Utilities
Vision provides utility components that can be used with no coding.
Culling Target Renderers
Enable / Disable the specified renderer's depending on the visibility of the bounding sphere.
✉ Help & Contribute
Questions and ideas are welcome in discussions.
We welcome contributions such as bug reports and pull requests.
📔 Author Info
Hiroya Aramaki is a indie game developer in Japan.
- Blog: https://mackysoft.net/blog
- Twitter: https://twitter.com/makihiro_dev
📜 License
This library is under the MIT License.